Edward Van Halen’s technique, tone, and style are legendary. Growing up listening to earlier-era Van Halen, I was awestruck by the raw, pure rock sounds that Edward produced from his guitars. In a period where rock guitar had become stagnant, Edward burst onto the scene like a fireball. As we moved into the 80’s, it seemed everyone had become an Eddie-clone, with their custom hot-rodded guitars strat-styled guitars and Marshall 100 watt tops. Edward’s sound from that era has been dubbed the “brown sound”. Let’s look into how what he used in the early days of Van Halen.
Guitars
Edward’s most famous guitar used for Van Halen’s earliest recordings was his white and black striped Stratocaster-style guitar pictured on the cover of Van Halen’s self-titled debut album. Though it went through various parts including different necks (a Kramer neck was put on it around the 1984-era), Edward’s basic guitar construction formula for his recording and various stage guitars, was a simple one.
In Guitar World’s January 1981 feature, Edward revealed that he in fact had a preference for unfinished maple necks as well as Gibson PAF pickups. In addition, he also worked with 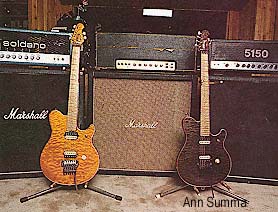 Seymour Duncan on custom Seymour Duncan guitar pickups. His necks were often maple “cap” necks, a two-piece design as used on late 60’s Fenders which softened the sometimes overly-bright one-piece maple necks. While he admitted using all different types of pickups, Edward’s preference at the time for replacement pickups (besides Gibson PAFs often taken from ES-335s) were those made by Seymour Duncan.
Edward’s guitar used on the first Van Halen record was a 1959 Fender Stratocaster (January 1981,Guitar World) body updated with various parts. The bridge on this first guitar was a standard Fender tremolo bridge from a 1958 Stratocaster (Note: other reports I found on the Internet have claimed that the guitar body itself is from various other years – 1965 shows up most often). On Van Halen II, a Charvel-bodied Stratocaster with its single rear humbucking pickup now rear mounted (this was Edward’s idea according to the April 1980 issue of Guitar Player) was used. The pickup used for the recording sessions was not the one seen in the photograph on the Van Halen II album. In fact, the true pickup he used was another custom Edward-creation. By loading a magnet from a PAF Gibson into a DiMarzio pickup and then rewiring it by hand, Edward eventually found a suitable tone he liked and that was the final pickup used for the guitar and the Van Halen II sessions.
For future guitars, Edward would mount his pickups directly to the inside body of the instrument, his feeling being that the pickups would work as “one” with his guitars and therefore sustain would be increased.
Another interesting Edward idea revealed in the April 1980 issue of Guitar Player was that he dipped many of his pickups in paraffin wax to reduce feedback noise. The idea was that the paraffin wax would prevent the subtle movement of the windings that caused feedback. Edward also admitted to killing a few pickups in the process as the wax sometimes burned through the coil windings when left to soak for too long a period.
Edward utilized the tremolo bar quite heavily and was the early adopter of the famous Floyd Rose double-locking tremolo system. His first guitar to incorporate a Floyd Rose was of course another custom Edward creation, this time featuring an all-mahogony body built by Boogie Bodies, and a Gibson PAF wired straight to the volume control. Edward’s complaint about the Floyd Rose design was that it would cause the tone to be a little thin and bright. As a result, the mahogany-bodied Boogie Stratocaster design (which was also actually thicker than a standard Stratocaster body) helped add sustain and counteract the “thinning out” that occurred with the Floyd. Because of the sonic characteristic changes that the Floyd Rose made, Edward opted to stick with guitars that used standard tremolo bridges in the studio and use Floyd-equipped guitars for live shows.
Inside his guitars, Edward bypassed all tone controls and wired his pickups with only one volume control, valued at 500K Ohms. There was no logic behind this, Edward admitted in the February 1990 issue of Guitar World, and he simply did it this way because when he put together his first guitar and removed the pickguard, he was uncertain how to wire all the tone controls and switches back together. Choosing to keep it simple, Edward simply discarded the unneeded parts and the world watched (as well as countless guitar makers) as Edward’s decision sparked a new trend for guitar design moving into the 1980’s.
For many of Van Halen’s early rhythm tracks that didn’t require a tremolo, Edward would often use a PAF-equipped Ibanez Destroyer. In the July 1985 issue of Guitar World, Edward talked about using this guitar on many famous tracks including, “You Really Got Me” and “Jamie’s Cryin’”. This guitar was made out of Korina wood and Edward is photographed with it on the “Women and Children First” album.
Finally, Edward also did use various other guitars for recording. Most notable besides the others mentioned previously are a Gibson ES-335, Les Paul, and Les Paul Jr. (with the SG double-horned body style).
Amplifiers
There are many misconceptions about Edward Van Halen’s primary amplifier used for recording. Rumors have abounded about the amplifier being heavily modified and some of these rumors were in fact generated by Mr. Van Halen himself (he admitted telling these stories to help generate business for tech friend Jose Arrendo’s shop). However, in truth according to our best knowledge, his amplifier of choice for recording, a mid-60’s 100 watt Marshall Super Lead, was primarily stock (Note: see studio diagram description for more info on this). Edward was adamant about getting his tone through the power tubes and consequently set all volume and tone controls on the Marshall to 10. He controlled the overall volume output in two ways.
First, he used an Ohmite Variac, a variable transformer that could lower or raise the voltage going into the amplifier (see photo for what a typical Variac looks like). Edward set the variac to approximately 90 volts, thereby reducing the amount of input voltage going to the amplifier (see the Marshall Super Lead article for more information about variacs and attenuators) and allowing the amp to run more reliably. A key element often not considered today when running vintage Marshall amplifiers is that many that were made for export to the U.S. were designed to run at 110 volts and current U.S. outlets run at 120 volts. As a result, while there has been much talk about the dangers of using a variac, in many applications, it obviously serves a benefit.
According to Gerald Weber of Kendrick Amplifiers, Inc., in the October 2000 issue of Vintage Guitar, he states, “You cannot harm your Marshall (or any other amp) by running it at lower-than-normal voltage. The opinions you’ve heard concern running the 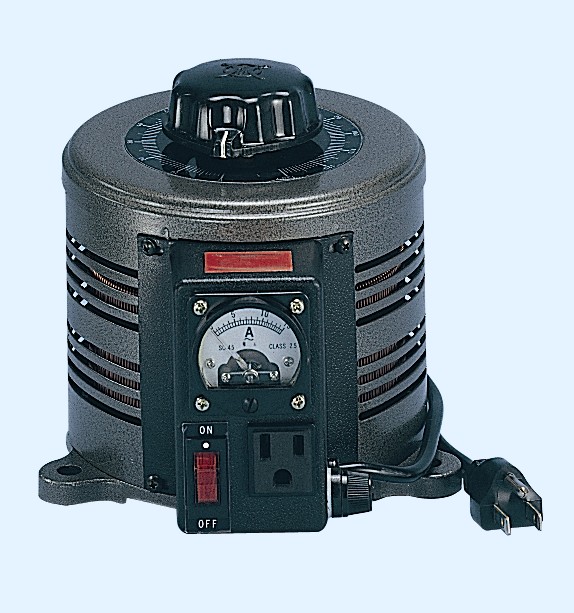 variac at higher than normal levels.”
The second way Edward controlled his overall output volume was that he would use a dummy load box after the Marshall head, in effect making the Marshall a preamp for the entire system. The output of the load box would then run through his effects which would then be sent to the input stage of a power amplifier (most often an H & H V800 MOS-FET model according to the September 1986 issue of Guitar World). The speaker output of his Marshall was set at 8 ohms and the dummy load box resistance was set to 20 ohms to help ease the strain of the amplifier being run at full volume.
The benefit of the dummy load configuration was not simply to control the volume levels (Edward liked things loud!), but also to enable his time-based effects to work and sound well within the signal chain. Anyone who has tried to run a flanger or a delay in front of a fully cranked Marshall will realize that the effects just don’t work well. In the case of the flanger, this is because the power tube distortion will compress and distort the flanger’s sweep and dynamics will be eliminated. For a delay run in this fashion, the repeats of a delay will be amplified and compressed also and not sound like a true echo. When Edward ran the Echoplex in between the Marshall and the H & H power amp, it also made the Echoplex much less noisy in addition to simply producing a better tone.
Various cabinet configurations were used (all Marshall however), but Edward was cited to either using cabinets loaded with Celestion vintage 30’s as well as 75’s for stage work. For studio recording, Edward typically used a sixties-era basket-weave bottom cabinet with his main Marshall plexi Super Lead (see photo). The year of his SuperLead model is speculated to be either a 1966 or 1967 model, according to one of Edward’s former guitar techs, Matt Bruck, in a 1991 Guitar World Axology report. In a 1985 interview with another former tech, Robin Leiren, he stated that the Marshall runs on Sylvania 6CA7 (a slightly heavier-duty version of an EL34 and long out of production) tubes.
In the studio for the debut Van Halen album, Edward ran the Marshall Super Lead through the dummy load setup into two older basket-weave Marshall bottom cabinets. One cabinet was loaded with 25 watt Greenback Celestion speakers, the other with JBLs. For Van Halen II, a standard configuration was used with just the Marshall Super Lead and a single cabinet played loud without the dummy load, but still employing a variac. Later recordings reverted back to the dummy load configuration.
In the studio, he would often record the amplifier using one or two Shure SM-57 microphones. In the two-microphone setup, one microphone would be aligned straight in the front and center of a speaker, the other would be setup at an angle parallel with the cone itself (from the March 1995 issue of Guitar. Note: though this technique was used for later recordings, it is mentioned here because the technique is certainly helpful for recording guitarists). In this way, he could adjust his recorded tone because of the different phase sounds created from the angles of the two microphones. The basic idea of the angled microphone was to provide more bass.
Processors
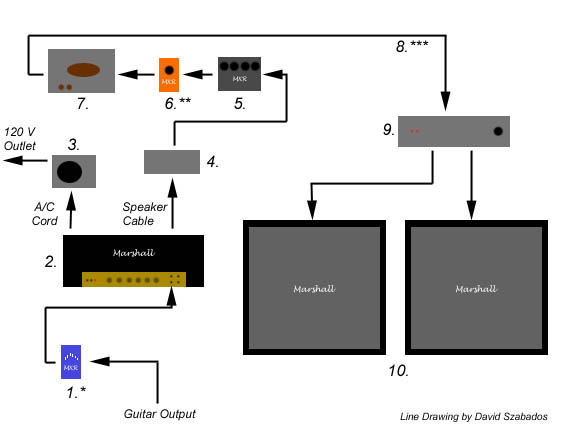
Before Edward used his racks of processors and complex Bradshaw switching system, he used a fairly simple live and recording setup. Contrary to popular believe, there was no preamp stomp box that he employed to help get additional distortion – this was achieved strictly through his amplifier. However, on occasion in the studio, Edward would use an MXR equalizer in between his guitar and amp set up to boost the mid frequencies of his pickups. See the diagram for a typical studio setup used for Van Halen I.
Edward also did use some effects to color his sound. On the first album, one can hear the slow phase effect of an MXR Phase 90 pedal on many sections. He also used an old Echoplex EP3 tape echo unit as well as an MXR Flanger. His pedal board consisted of these three devices, but in the studio, extra equalization was often employed in his dummy-load setup, consisting of an equalizer placed just prior to his H & H power amplifier.
Also known to be very creative with instruments and effects, Edward employed many unusual uses of effects. Listen to the intro of “And The Cradle Will Rock” to hear the sound of an MXR Flanger being placed in between Edward’s electronic keyboard and a cranked Marshall.
In the studio for the debut Van Halen album, Edward ran the Marshall Super Lead through the dummy load setup into two older basket-weave Marshall bottom cabinets. One cabinet was loaded with 25 watt Greenback Celestion speakers, the other with JBLs. For Van Halen II, a standard configuration was used with just the Marshall Super Lead and a single cabinet played loud without the dummy load, but still employing a variac. Later recordings reverted back to the dummy load configuration.
In the studio, he would often record the amplifier using one or two Shure SM-57 microphones. In the two-microphone setup, one microphone would be aligned straight in the front and center of a speaker, the other would be setup at an angle parallel with the cone itself (from the March 1995 issue of Guitar. Note: though this technique was used for later recordings, it is mentioned here because the technique is certainly helpful for recording guitarists). In this way, he could adjust his recorded tone because of the different phase sounds created from the angles of the two microphones. The basic idea of the angled microphone was to provide more versatility of tonal choice.
Typical Early Edward Van Halen Studio Setup Diagram
1. MXR e.q. set up as midboost (* only occasionally used depending on the guitar)
2. Marshall plexi Super Lead, unmodified, although simple modifications such as a cascaded input stage or added gain through capacitor/resistor exchanges may have been made.
3. Ohmite VARIAC set to approximately 90 Volts A/C
4. Dummy Load
5. MXR Flanger
6. MXR Phase 90 (** This was sometimes put in front of the amp instead of after the dummy load)
7. Echoplex EP3
8. (***Equalization sometimes added prior to power amp)
9. H & H power amp
10. Various Marshall cabinets (sometimes two, sometimes four) used with various Celestion and JBL speakers
Don’t Forget Edward’s Technique!
One can have the identical setup as Edward and still not sound like him. That is because equipment is only a part of the equation – technique makes up the rest.
Eddie used various picks and string gauges in the early Van Halen days, but consistently used a very heavy picking attack when playing the more aggressive Van Halen passages. Edward more typically used 9 gauge strings and heavy to medium Fender picks. Later he moved to thinner picks. An unorthodox approach, Edward holds his pick between his right thumb and middle finger and taps with his index finger.
In addition, on early recordings especially, Edward often would make the guitar sound more lively with harmonic overtones by using his thumb to dampen the strings very slightly when playing certain chords. In this way, the sound would be brighter and more energized and was a perfect complement to the high-energy music itself. Edward was also a master at dampening all of the notes he did not play and used both his hands to facilitate this control.
” …there was no preamp stomp box that he employed to help get additional distortion – this was achieved strictly through his amplifier. ”
This statement is not entirely true. Here’s photographic evidence that Edward was using a Schaffer Vega Diversity Wireless (SVDS) wireless system in the studio during the early recordings. His wireless system employed a compressor in the transmitter, expander in the receiver, circuitry to accentuate mid frequencies, and a massive boost circuit intended to drive a monitor. Like Angus Young, David Gilmour, Carlos Santana and many others, EVH was using this boost in the studio to push the front end of his amps. The boost function on this unit was designed after analog studio consoles that increase upper harmonics to retain clarity at higher gain levels. You can find out more about the history of the SVDS wireless system and the non-wireless reproduction here: http://www.solodallas.com
Thanks for bringing this to my attention as well as for the readers. Interestingly enough, I was recently made aware of the stomp-box version of this wireless circuit as well as Angus Young’s endorsement of the technology. It’s fascinating to read the history of the use of the wireless and its circuit and makes perfect sense that many artists including EVH would take advantage of the boosting characteristics of it. I know that there was a period of time in the 70s when certain players really wanted to have a “pure” signal (EVH and Angus Young certainly both were in that camp) and so the use of overdrive pedals as boosts was frowned upon. This system would certainly be a way to work around that whole stigma.
This diagram isn’t totally logical because since the amp goes to the dummy load, it makes more sense to put the effects in the Marshall’s effects loop. Putting the effects after the load box would only create more noise or signal loss. With that said, essentially what’s happening here is a tube amp is driving a solid state amp through it’s bridging to speakers. Again though, putting the effects in between the two is not only bizarre, but it doesn’t really make sense. It certainly wouldn’t be cleaner, that’s for damn sure.
You have to think about this configuration in a different way. In this setup, the Marshall amp itself in its entirety becomes the preamp, whereas the amp it feeds into is the power amp. The effects are placed in between them and part of the dummy load is tapped to provide the signal to the effects (the rest of the energy of the Marshall as a “preamp” is given to the resistive load). It’s logical if you think about it and very ahead of its time conceptually. In a typical effects loop (Note: Marshall 100 watt plexis did not have effects loops), the effects are placed in between the preamp and output tube stages. EVH just did this “outside the box”.
That’s because 60’s plexis dont have effects loop.
May be true, but still, those effects (Flange/Phase/Echo) would be noisy as all hell if you didn’t at least have a decent gate. How on earth could you possibly clean it up like the sound on the first VH self-titled? I mean, I have to even use two gates with my amp (Peavey VTM-120) otherwise the hiss would be dreadful, especially when recording.
There’s a lot of processing and “magic” in the studio; in the 1970’s I’m sure noise gates, compressors, and filtering all had their place and use.
That’s not correct. Putting the power section in front of time based effects like delays and flangers is proven to be the best sounding chain possible. Effects loops are great if you use nothing but preamp distortion,but with a non-master amp,even with an effects loop, you would still have the phase inverter and output tubes clipping AFTER the effects which would cause intermodulation distortion and muddy up the echo. This is the cleanest and quietest way of doing it with non-master volume amps. As long as the output from the effects is at line level, you can drive a clean solid state power amp with no problems. I use a setup similar to this even though I’m not a huge Van Halen fan.
What I forgot to add,and what they don’t tell you on this site,is that after the dummy load which can be resistive or inductive, You have to bring the speaker level down to line level with a voltage divider and shape the frequency response either passively or with an E.Q. If you did’nt do this, the strength of the speaker signal would massively overload any effects following it, which WOULD result in a horrible sound and tremendous noise. Take care -Dave
And by “voltage divider” you mean? Are you referring to the attenuator part usually built into a small load box? Regardless, to my knowledge, most amps already have voltage regulation built into them too (but not attenuation).The rest of what you’re saying just sounds like the output of the load box being sent to a mixing console (EQ) with a mic’d cab, so you’d have two lines, 1 mic and 1 with effects from the load then to console. Is that what you mean? I still think it’s pointless to drive a solid state amp with a tube amp though. I just can’t wrap my head around the logic, except for maybe louder volume.
By “voltage divider” I mean your basic two resistor voltage divider where: V out = V in x R2/R1+R2. You could also use a low value pot and set it to whatever output strength you want. Back when Eddie started doing this,there was no such thing as THD hotplates or a Weber MASS which can include a lineout along with acting as a loadbox or attenuator. So he had to use a huge power resistor (they look like a stick of dynamite, only bigger) to take the load of his Marshall. You would then branch off the load resistor into a voltage divider(either fixed or variable)shape the signal with an eq, and send the signal into your effects which would in turn send it’s signal to the input of the poweramp then speakers. Basically turning his entire amp into a preamp to drive his effects then poweramp and speakers. This may seem odd to some people, but if you think about it, it’s the best way to achieve power tube and output tranny saturation BEFORE your effect for the best noise and least intermodulation artifacts. I use this type of setup and will never go back to anything else. As far as direct recording, I never do that. You can get good results with clean sounds,but with any type of distortion,I have always noticed fizzy bits that you can’t e.q. out despite the ‘ol narrow Q notch at 6 to 8K that you here about. I’ve tried just about every so-called cabinet and speaker sim out there, and it’s always the same…diconnected fizz. I am, however, way too picky for my own good! Cheers.
Well I think they do modulation effects after recording in the studio.
With ’80-s records its like: record the raw guitars->play it through the effects->record to another tape
That’s how they did it before digital stuff came in.
its beyond proven there is absolutely no difference in neck material in regards to brightness,tone or whatever.
listen to yngwie malmsteen,deep purple or many other artists music played on a rosewood neck,a maple neck
then a scalloped neck and you will quickly notice there is absolutely no sonic difference.playability is the only variance.
Actually, there is a bit of a difference. Check out the Maple/Rosewood Strats on Juxtatone.com.