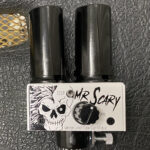
 Created in collaboration with George Lynch, the Mr. Scary Mod is a custom-modified version of the Hot Mod V2. Want to supercharge your classic Marshall (and many other!) amps with more gain without applying a permanent modification? Then read more below and welcome to the Mr. Scary Mod!
HOT MOD V2 EVO: The Ultimate Marshall High-Gain Plug-in Tube Modification Module!
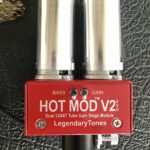 Introducing the LegendaryTones HOT MOD V2 EVO, a plug-in dual tube module specifically engineered to dramatically increase gain in Marshall and other amps. The HOT MOD V2 EVO requires NO chassis cutting, drilled holes, or wiring modifications to your amp – it simply and easily installs in place of the appropriate cathode follower (often V2) position. The circuit within harnesses the power of an additional gain stage now running an additional tube.
Want your classic Marshall to sing with increased sustain and pure vacuum tube tone? Your tube high-gain solution is here. No solid state tricks or clipping diodes. 100% pure tube gain. The HOT MOD V2 EVO circuit was carefully designed to give you gradual increases of gain when using the amp’s preamp control. From adding a touch of sweet sustain, to full on metal, your Marshall will now have greater flexibility and deliver a wider range of tones.
Continue reading
Hot Mod V2 Evo & Mr. Scary Mods: Not Just About “More Gain”?
After the release of the first Hot Mod V2 in 2019, our new tube plug-in device was an immediate hit, but we still wanted and appreciated the feedback we received from customers. Our work wasn’t done. In fact, it was through our customers’ collective feedback that led us to refine the circuit further with the introduction of our Hot Mod V2 Evo (a.k.a. The Evolution) we offer today. Knowing what musicians want from their tube amplifiers – whether it’s a particular type of tone or how an amp feels/responds – is invaluable. We are a small, but fiercely customer-focused company. With that said we were very surprised with ONE particular use-case request for our mods that we received time and time again. More on this in just a moment so we can first provide background context.
Continue reading
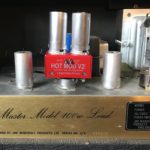
Marshall SC/SV and Friedman Combo Fastening System for LegendaryTones Mods!
This page is for ordering mods for the Marshall SC20C and SV20C series combos as well as certain Friedman combo amplifiers only.
Continue reading
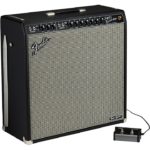
Fender Tone Master Super Reverb Amp: Solid State Re-imagined
 Guitar players at the two sides of the extremes of tone can fall into two camps when it comes to amplification. First, they can be the purist traditionalists who refuse to play nothing else unless they use vacuum tubes as they are after all “the real thing” those silly tech modelers try to imitate. Or, they can embrace all new forms of technology of modeling and solid state, and at the most extreme, go down that endless rabbit hole of options by spending more time playing with tech rather than playing their instrument.
Continue reading
Authorized Dealers
 Check out these fantastic dealers below for immediate stock or if they are in your area and you’d like to visit them locally.
Continue reading
Dr. Dan 12000 Series 1968 Marshall Super Lead Replica Nails the Early EVH Amp Tone!
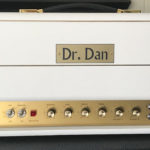 Many amplifiers have come and gone in my music room through the years, and a small handful have been genuinely missed. One in particular that I was always interested in having back in the fold was an original 1968 Marshall model 1959 Super Lead with the serial number range in the 12,000s. I owned just one many years ago but had needed to sell it, along with many other pieces, during a more challenging time in life. The memory of that amp remained with me through the years that followed as it had that perfect blend of creaminess and crunch in its tone as well as a feel that delivered the perfect amount of compression. Indeed, it was truly one of the good ones. And no doubt the best Marshall I’ve ever had.
Continue reading
Hot Mod V2 Tube Update from 7/21 Forward!
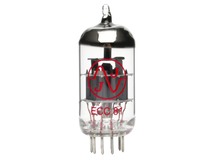 Recently we’ve played around with different tube combinations and so going forward, all units shipping from July 2021 forward will be outfitted using a single 12AT7/ECC81 tube in the first position of the Hot Mod V2 Evo and a 12AX7/ECC83 in the second position. Continue reading
David Szabados Interview on GEARCAST Show
Check out the recent GEARCAST show on Kyle Bull’s YouTube channel where I had a great discussion about all things related to guitar tone and music.
Will my Hot Mod V2 or Lynch Mod/Mr. Scary Mod work in my amp?
Perhaps this is the most common question we receive here when people first inquire about the Hot Mod V2, Lynch Mod, and Mr. Scary Mod. And of course we also offer a reverse-wired version so that either model can also function in many of the reissue amps which the original Soldano Hot Mod could not. In general, although there are non-master and master volume amps listed here, note that all of our mod devices generally work better if your amp has a master volume on it. So here is the list: